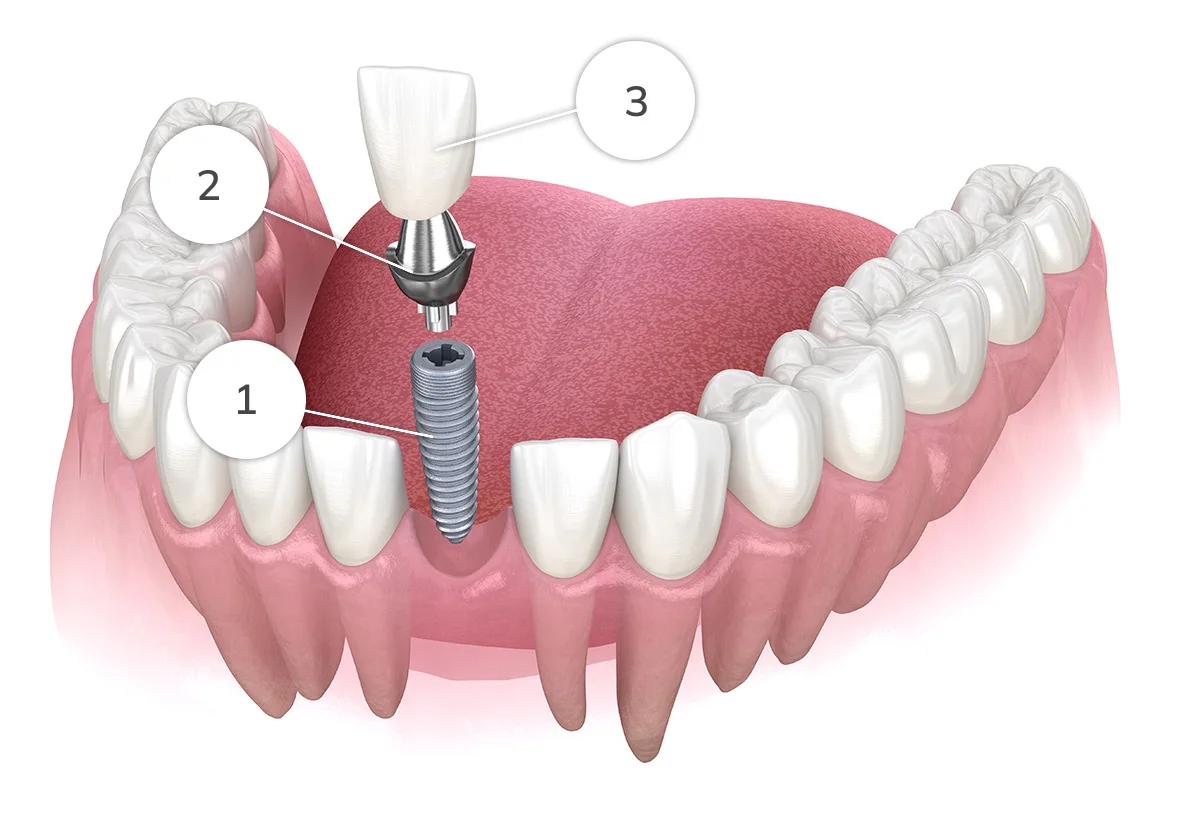
Match implant macro-design and micro-design to bone quality, ridge morphology, and loading protocol — that single principle drives better outcomes more reliably than brand preference or cost alone. Systematic reviews consistently report survival rates often exceed 90% across bone-level and tissue-level configurations over 1–5 years, and a long-term cross-sectional study following 336 implants over a mean of 11.2 years found high survival rates for bone-level and tissue-level implants. The ITI consensus position reinforces this: holistic selection criteria that weigh biomechanics, soft-tissue biotype, and restorative plan consistently outperform single-variable decisions.
Three quick clinical anchors before you read further:
- Primary stability targets: Aim for clinically adequate insertion torque and ISQ values for immediate loading protocols; tapered, deep-threaded designs achieve higher primary stability in soft bone than parallel-walled alternatives.
- Tapered vs. parallel: Tapered macro-shapes with aggressive thread geometry are preferred for immediate placement and low-density bone, while parallel-walled designs are suitable for dense bone sites where compressive stress is a concern.
- Bone-level vs. tissue-level: Bone-level implants with platform switching are preferred in the esthetic zone and where crestal bone preservation is the priority; tissue-level designs simplify soft-tissue management in posterior, non-esthetic sites with adequate mucosal thickness.
How dental implant designs are classified and what each type does
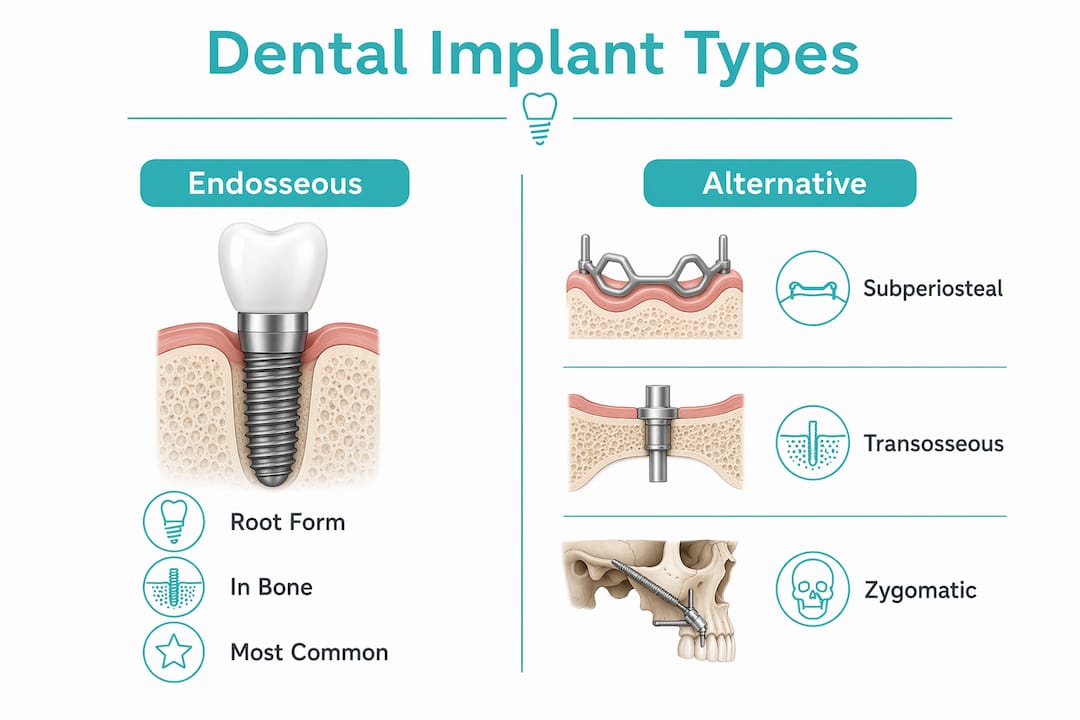
Understanding the full taxonomy of implant configurations is the foundation of evidence-based selection. Each class addresses a specific anatomic or clinical constraint; for practical descriptions of implant types, see Dental Implants Amsterdam | Strong & Natural Replacement.
The dominant category in contemporary practice. Placed entirely within alveolar bone, root-form implants rely on osseointegration for stability. They subdivide into cylindrical (parallel-walled) and tapered variants, with further distinctions by surface treatment and connection type. Virtually all modern two-piece implant systems fall here.
Subperiosteal implants
A custom metal framework resting on the cortical bone surface beneath the periosteum, used when vertical bone height is insufficient for endosseous placement and the patient declines or cannot tolerate augmentation. Rarely placed today given advances in short implants, zygomatic fixtures, and guided bone regeneration, but still relevant for select fully edentulous patients with severe atrophy.
Transosseous implants
Pass entirely through the mandible from inferior border to alveolar crest. Largely historical; replaced by zygomatic and short-implant strategies.
Zygomatic implants
Engage the zygomatic arch rather than the maxillary alveolus, providing cortical anchorage in severely resorbed maxillae. Require specialized surgical training and are indicated when bone volume precludes conventional implants even with grafting.
Mini implants
Diameter below 3.0 mm. Used for mandibular overdenture retention, transitional prosthetics, and narrow-ridge sites. Mechanical limitations restrict their use under heavy occlusal loads.
Bone-level vs. tissue-level: the clinical distinction that matters most day-to-day
In bone-level (BL) implants, the implant shoulder sits at or slightly below the alveolar crest, placing the implant–abutment junction (IAJ) close to bone. Tissue-level (TL) implants carry a machined transmucosal collar that positions the IAJ supragingivally, away from crestal bone. That supracrestal positioning may reduce bacterial infiltration at the junction and simplify soft-tissue management, particularly in posterior sites with thick mucosa.
The comparative evidence shows no statistically significant difference in peri-implant disease prevalence between BL and TL designs overall. Where a difference does emerge, it favors narrow-diameter TL implants: Narrow-diameter tissue-level implants showed a lower peri-implantitis rate compared to bone-level implants in the same cohort.
| Implant class |
Typical indication |
Key anatomic requirement |
Primary limitation |
| Endosseous root-form (tapered) |
Single tooth, short-span bridge, immediate placement |
Adequate bone volume, D1–D4 |
Requires osseointegration time |
| Endosseous root-form (parallel) |
Standard posterior sites, dense bone |
D1–D2 bone, sufficient width |
Lower primary stability in soft bone |
| Subperiosteal |
Severe atrophy, no augmentation possible |
Cortical surface only |
Custom fabrication, limited evidence base |
| Zygomatic |
Severely resorbed maxilla |
Zygomatic arch engagement |
Specialist training required |
| Mini implants |
Overdenture retention, narrow ridges |
Minimal bone width |
Load limitations |
| Bone-level |
Esthetic zone, platform switching |
Crestal bone volume |
IAJ near bone; requires precise placement depth |
| Tissue-level |
Posterior non-esthetic, thick mucosa |
Adequate mucosal height |
Supracrestal collar limits esthetic flexibility |
Macro-design and thread geometry: how shape drives primary stability
Macro-shape and thread variables are the most directly modifiable determinants of primary stability. Getting them right at the planning stage is more efficient than trying to compensate intraoperatively.
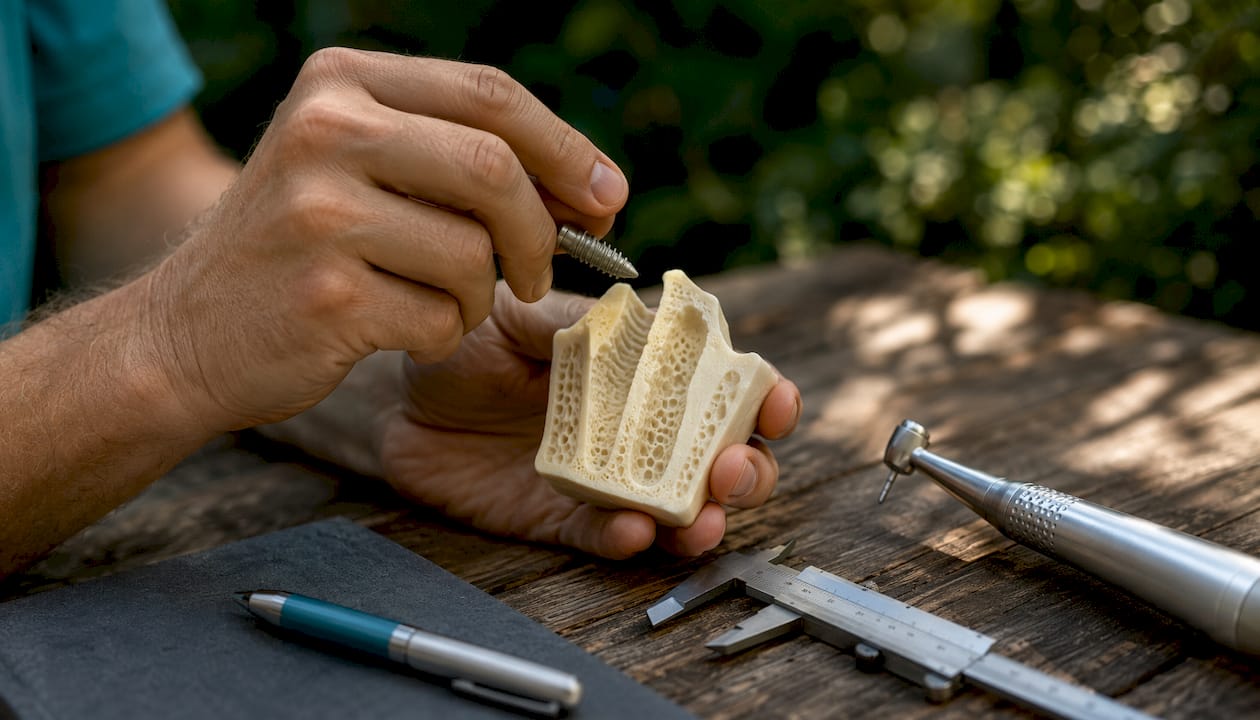
Tapered vs. parallel macro-shapes
Tapered implants compress bone laterally during insertion, generating friction-based stability independent of thread engagement alone. That compression effect is especially valuable in Type 3–4 bone, where trabecular density is low. Parallel-walled (cylindrical) implants distribute stress more evenly along the full implant body, which suits dense D1–D2 bone where excessive compression risks microfracture or bone necrosis.
The clinical consequence is straightforward: tapered, deep-threaded designs consistently achieve higher primary stability metrics in immediate placement and low-density bone scenarios. For immediate loading, that translates directly to whether you can deliver a provisional on the day of surgery.
Thread geometry variables and their biomechanical effects
Four thread parameters matter clinically:
- Thread depth: Deeper threads engage more bone per revolution, increasing pull-out resistance and insertion torque. Beneficial in soft bone; risks compressive overload in dense bone unless the osteotomy is modified.
- Thread pitch: Closer pitch (more threads per millimeter) increases surface area contact. Wider pitch advances the implant faster per turn, useful in dense bone to reduce heat generation.
- Flank angle: V-threads concentrate stress at thread tips; square or buttress threads distribute load more broadly along the flank, reducing peak stress at the bone–implant interface.
- Thread pattern: Microthreads at the coronal aspect are designed to preserve crestal bone by distributing functional load to the marginal bone rather than concentrating it apically.
Matching thread design to bone density
In D3–D4 bone (Types 3 and 4 by the Misch classification), aggressive deep threads with a tapered body are the standard choice. The lateral compression and high surface engagement compensate for poor trabecular support. In D1–D2 bone, the same aggressive thread geometry can generate compressive stress that exceeds bone tolerance, so a parallel-walled design with shallower threads and a wider-pitch osteotomy preparation is safer.
Pro Tip: In Type 4 bone, undersize the osteotomy by 0.5–1.0 mm relative to the implant diameter and use a tapered design with deep threads. Monitor insertion torque in real time; if it exceeds 50 Ncm, stop and assess for bone necrosis risk before completing seating.
Surface treatments and materials: what the evidence says about osseointegration
Material choice and surface modification affect the speed and quality of osseointegration, the soft-tissue response, and long-term cleanability. None of these variables operates in isolation.
Implant materials
- Commercially pure titanium (cpTi, Grades 1–4): The historical standard. Excellent biocompatibility and osseointegration track record; lower strength than alloys, which limits use in narrow diameters.
- Ti-6Al-4V (Grade 5 titanium alloy): Higher tensile strength, enabling narrower implant bodies without fracture risk. Widely used in narrow-diameter and mini implant designs.
- TiZr (Roxolid-type alloys): Titanium-zirconium alloys offer strength superior to cpTi with comparable biocompatibility, making them the material of choice for narrow-diameter implants in sites with limited bone width.
- Zirconia: Tooth-colored, metal-free option with good biocompatibility and esthetic appeal. Fracture resistance has improved with monolithic designs, but long-term clinical data remain thinner than for titanium, and retrievability is more complex.
Surface treatments and their clinical relevance
Machined (turned) surfaces were the original standard; they remain in use on the transmucosal collar of TL implants, where a smooth surface may reduce bacterial adhesion. Micro-rough surfaces, produced by sandblasting and acid-etching (SLA), titanium plasma spray (TPS), or anodization, increase surface area and promote faster osteoblast attachment.
Hydrophilic modifications of SLA surfaces (SLActive-type) accelerate early protein adsorption and cell attachment, with clinical data suggesting faster osseointegration in the first 2–4 weeks. That acceleration matters most for early loading protocols (6–8 weeks) and for patients with compromised healing capacity.
Bioactive coatings, including hydroxyapatite and calcium phosphate layers, aim to promote direct bone bonding. Evidence for long-term superiority over SLA surfaces is mixed; coating delamination remains a concern in some systems.
A long-term cross-sectional study found that greater mucosal thickness was independently associated with reduced peri-implantitis risk, underscoring that surface treatment alone cannot compensate for inadequate soft-tissue volume at the implant site.
Clinical trade-offs by material:
- Zirconia implants are harder to retrieve if osseointegration fails; plan accordingly in younger patients.
- TiZr narrow implants reduce fracture risk but require careful occlusal loading assessment.
- Hydrophilic surfaces justify their cost in immediate or early loading cases; in standard delayed protocols, the advantage narrows.
The connection geometry between implant and abutment determines micro-motion, bacterial infiltration at the IAJ, and the mechanical load path to crestal bone. Platform design adds a second layer of influence on marginal bone behavior.
Connection types compared
| Connection type |
Micro-motion control |
Bacterial seal |
Screw loosening risk |
Retrievability |
| External hex |
Moderate |
Lower (exposed hex) |
Higher |
Easy |
| Internal hex |
Better |
Improved |
Moderate |
Good |
| Conical/Morse taper |
Best (cold-weld effect) |
Highest |
Lowest |
More complex |
External hex connections were the original two-piece standard. The hex sits proud of the implant platform, making it susceptible to lateral micro-motion under load. Screw loosening rates are higher than with internal connections, and the exposed IAJ is closer to bone in BL configurations.
Internal hex designs move the connection inside the implant body, reducing lateral play and improving the bacterial seal. Most contemporary BL implant systems use some form of internal connection.
Conical (Morse taper) connections generate a friction-fit that approaches a cold-weld under occlusal load, minimizing micro-motion to near zero. The prospective clinical trial comparing BL and TL designs noted that BL implants with internal Morse taper connections showed crestal bone remodeling of just 0.05 mm at one year on the mesial surface, versus 0.47 mm for TL implants in the same study.
Platform switching places a narrower-diameter abutment on a wider-diameter implant platform, shifting the IAJ horizontally away from the crestal bone. The biological rationale is that the connective tissue attachment migrates inward along the platform step, creating a wider soft-tissue seal and reducing inflammatory cell proximity to bone.
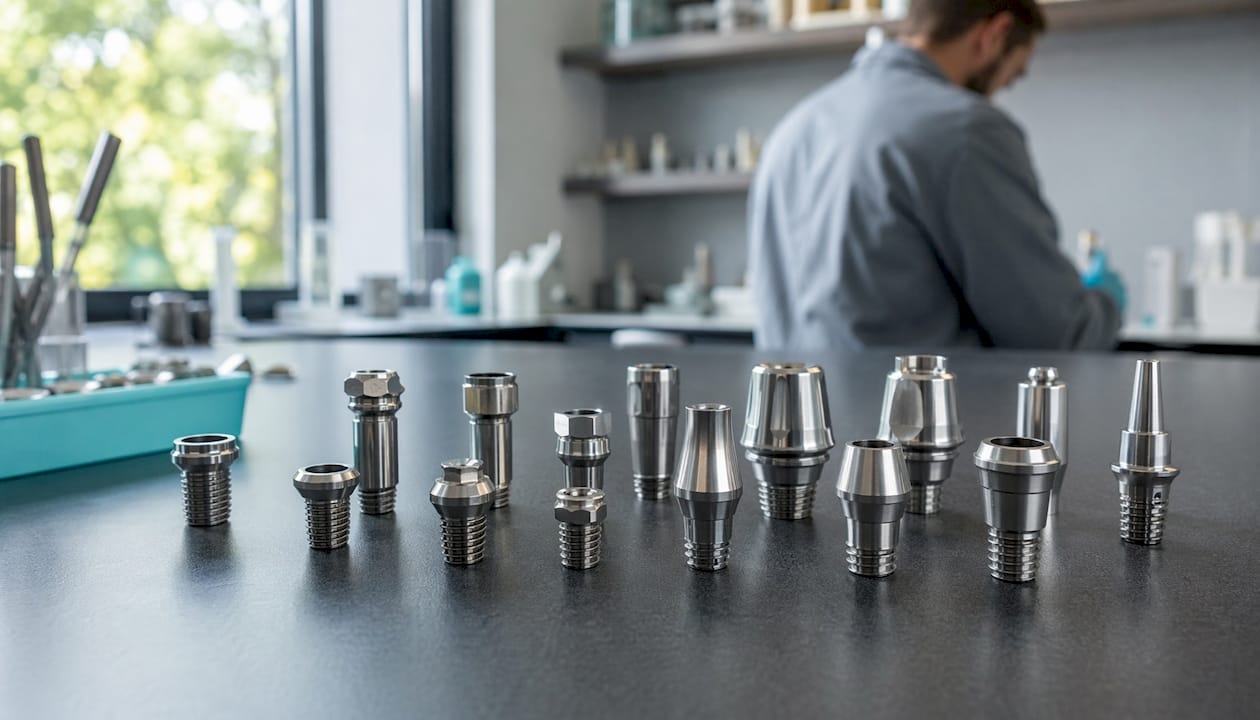
Evidence from a systematic review of 1,439 implants across 15 publications found that platform-switched implants consistently showed favorable bone remodeling, with no differences in implant failure rates compared to platform-matched designs. For clinicians prioritizing crestal bone preservation in the esthetic zone, platform switching is the default choice.
Key connection and platform selection points:
- Use Morse taper connections in high-load posterior sites and in patients with parafunction.
- Platform switching is most valuable in the anterior esthetic zone and in thin-biotype patients.
- External hex connections remain acceptable for straightforward posterior cases with standard loading, but require torque verification at recall.
- Never place a platform-matched external hex in a thin-biotype anterior site if a platform-switched internal option is available.
How to match implant design to site, bone quality, and loading protocol
Clinical selection is a decision tree, not a preference list. Work through these variables in order before specifying an implant.
Preoperative site assessment checklist
- CBCT review: Measure available bone height, width, and density (Hounsfield units as a proxy for Misch D1–D4 classification). Identify proximity to anatomic structures (inferior alveolar canal, sinus floor, adjacent roots).
- Mucosal thickness: Probe or measure on CBCT. Thin biotype (less than 2 mm) increases peri-implantitis risk; consider soft-tissue augmentation or a TL design with a longer transmucosal collar.
- Ridge morphology: Assess buccal plate thickness and presence of dehiscences or fenestrations. Knife-edge ridges may require grafting or a narrow-diameter implant.
- Occlusal scheme and parafunction: Bruxism significantly increases mechanical complication risk; factor this into connection choice and implant diameter.
- Systemic factors: Uncontrolled diabetes, active smoking, bisphosphonate use, and immunosuppression all affect osseointegration timelines and complication rates.
- Restorative space: Confirm interocclusal clearance for the planned prosthetic component before selecting platform level.
Decision thresholds for loading protocol
For immediate loading, the evidence-supported targets are insertion torque of 25–45 Ncm and ISQ above 65–70. Below these thresholds, early or delayed loading is safer. Tapered deep-threaded designs reach these thresholds more reliably in Type 3–4 bone than cylindrical alternatives.
The 3/2 spacing rule requires a minimum of 3 mm between an implant and an adjacent natural tooth and at least 2 mm between two adjacent implants. Apply this rule using CBCT-based measurements rather than periapical radiographs alone; parallax error on 2D films frequently underestimates proximity to adjacent roots.
Design adjustments for challenging sites
- Immediate placement: Tapered implant with deep threads; confirm gap between implant and socket wall is less than 2 mm or graft the gap.
- Short implants (less than 8 mm): Wider diameter compensates for reduced length; surface treatment quality becomes more critical.
- Narrow-diameter implants: TiZr alloy reduces fracture risk; avoid in heavy parafunction without occlusal guard.
- Atrophic ridges: Consider cortical anchorage strategies (osseofixation), zygomatic implants, or staged augmentation before conventional endosseous placement.
- Esthetic zone: BL implant with platform switching, hydrophilic surface, and soft-tissue augmentation if biotype is thin.
Mucosal thickness is a planning variable, not an afterthought. Evidence consistently links thicker mucosa to lower peri-implantitis risk, and soft-tissue augmentation at the time of implant placement is far simpler than managing recession later.
Surgical and prosthetic workflow implications of your design choice
The implant you select determines the surgical steps, the prosthetic components available to you, and how straightforward future maintenance will be.
How macro-design changes the surgical protocol
Tapered implants generally require a tapered osteotomy sequence that undersizes the final preparation relative to the implant diameter. The degree of undersizing depends on bone density: more aggressive undersizing in soft bone, closer to full diameter in dense bone. Parallel-walled implants use a cylindrical drill sequence that matches the implant body more closely.
Countersink use is design-specific. Some BL systems require a countersink to seat the implant shoulder at the planned crestal level; skipping this step in dense bone risks crestal overload and early bone loss. Torque ramping during final seating, slowing insertion when resistance increases, reduces the risk of thermal necrosis.
BL implants require a healing abutment that establishes the emergence profile through the soft tissue. The choice of healing abutment diameter and height directly shapes the peri-implant mucosal architecture before the final restoration. Getting this right at second stage is far easier than trying to correct a collapsed emergence profile at the impression appointment.
TL implants simplify this step because the transmucosal collar is part of the implant body. The trade-off is less flexibility in customizing the emergence profile for esthetic cases.
For impression strategy, BL implants with internal connections typically use either open-tray or closed-tray impression copings; digital scanning with scan bodies is increasingly standard and eliminates polyvinyl siloxane distortion. TL implants with standard collar heights are straightforward to scan or impress conventionally.
Pro Tip: For BL implants in the esthetic zone, use a custom provisional with a convex emergence profile for 6–8 weeks before the final impression. The soft tissue will mature around the provisional shape, and your final restoration will seat into a pre-formed mucosal architecture rather than a flat healing abutment profile.
Maintenance and retrieval planning
Morse taper connections are the most mechanically stable but require more force to disassemble. If cement-retained restorations are planned over internal connections, excess cement removal is harder to verify; screw-retained designs are preferable for retrievability. Document the implant system, connection type, and abutment screw torque value in the patient record at placement — this information is essential for any future clinician managing the case.
Clinical evidence: survival rates, marginal bone changes, and what the data actually shows
The evidence base for implant design comparisons is large but heterogeneous. Here is what the strongest sources actually support.
Bone-level vs. tissue-level: the survival and bone loss picture
A systematic review found no consistent, clinically meaningful differences in survival between BL and TL implants across 1–5 year follow-ups. Individual trials show variation, but no universal superiority for either design has emerged. The long-term cross-sectional data (mean 11.2 years) confirm this: BL and TL implants demonstrate comparable survival rates, a difference that did not reach statistical significance at the patient level.
Marginal bone behavior tells a more nuanced story. A prospective clinical trial found significantly less mesial crestal bone remodeling is lower around BL implants compared to TL implants at one year, though both values fell within clinically acceptable limits (less than 0.5 mm). A retrospective study of 337 implants cited in the same source reported average bone losses of 0.3–0.48 mm for BL and 0.6–0.93 mm for TL implants across 12–36 months.
| Outcome |
Bone-level |
Tissue-level |
Clinical interpretation |
| Survival rate (11.2-year mean) |
survival rates often exceed 90% |
survival rates often exceed 90% |
No significant difference |
| Peri-implantitis prevalence |
— |
— |
no statistically significant difference |
| Mesial bone remodeling (1 year) |
0.05 mm |
0.47 mm |
BL significantly lower (p = 0.048) |
| Peri-implantitis, 3.3 mm TL vs. BL |
9.6% (BL) |
4.8% (TL) |
TL significantly lower (p < 0.001) |
Peri-implantitis prevalence and what drives it
Meta-analyses report pooled peri-implant mucositis prevalence around 18.8% and peri-implantitis around 9.6% across long-term studies. Design contributes, but plaque score, smoking, implant diameter, and mucosal thickness are stronger predictors in multivariate models. The cross-sectional data show that implant diameter influences peri-implantitis prevalence, with narrower implants associated with lower rates, a statistically significant difference (p = 0.02). The observed peri-implantitis prevalence in comparative cohorts is 9.6% overall, with narrow TL implants reporting 4.8%.
Where the evidence is weakest
Comparisons across different implant systems, surface treatments, and loading protocols in the same review create substantial heterogeneity. FEA and bench-testing data provide mechanistic insight into stress distribution but do not map directly to clinical bone remodeling. Treat biomechanical modeling as hypothesis-generating, not as a substitute for clinical outcome data.
Mechanical and biological complications: design links and prevention
Most complications are predictable. The majority trace back to a mismatch between implant design, site conditions, and restorative load.
Mechanical complications
- Screw loosening: Most common with external hex connections and cement-retained restorations under lateral load. Prevention: use internal or conical connections in posterior sites; verify and re-torque abutment screws at the first recall.
- Implant fracture: Highest risk with narrow-diameter implants (less than 3.3 mm) under heavy occlusal forces or in patients with parafunction. Prevention: select TiZr alloy for narrow implants; fabricate an occlusal guard for bruxers.
- Abutment fracture: More common with zirconia abutments under high load. Prevention: use titanium or titanium-based abutments in posterior high-load sites; reserve zirconia abutments for anterior esthetic cases with light occlusion.
- Component mismatch: Using non-original prosthetic components on an implant system introduces tolerance gaps that increase micro-motion and screw loosening risk.
Biological complications
Peri-implant mucositis prevalence sits at 18.8% in pooled data, and peri-implantitis at 9.6%. Smoking carries an odds ratio of 4.54 for peri-implantitis in multivariate analysis; higher plaque scores increase odds of both mucositis (OR 1.29) and peri-implantitis (OR 1.45). Greater mucosal thickness is protective, with an odds ratio of 0.17 for peri-implantitis in the same dataset.
Design-related biological risk factors include:
- IAJ location at or below the crest (BL designs) increases bacterial proximity to bone; platform switching partially mitigates this.
- Rough surface extending to the implant shoulder increases biofilm retention if marginal bone recedes.
- Subcrestal placement depth beyond 1–2 mm increases crestal bone remodeling without a compensating stability benefit in most cases.
Prevention framework
- Assess and augment mucosal thickness before or at implant placement when biotype is thin.
- Establish a 3–6 month maintenance recall with standardized probing and radiographic monitoring.
- Torque-verify abutment screws at the first recall and annually thereafter for external hex connections.
- Educate patients on interdental cleaning around implants; standard floss technique is insufficient for most implant-supported restorations.
- Address parafunction with an occlusal guard before final restoration delivery.
Quick treatment-planning checklist for everyday cases
Work through this sequence for every implant case before you order components.
Stepwise planning checklist
- Step 1 — CBCT review: Confirm bone height, width, and density. Classify bone as D1–D4. Identify anatomic risk structures.
- Step 2 — Spacing check: Apply the 3/2 rule. Minimum 3 mm to adjacent natural tooth, 2 mm between implants. Flag any site that requires diameter adjustment.
- Step 3 — Soft-tissue assessment: Measure mucosal thickness. If less than 2 mm, plan connective tissue graft or select a TL design with a longer collar.
- Step 4 — Macro-design selection: D1–D2 bone: parallel-walled, standard thread. D3–D4 bone or immediate placement: tapered, deep-threaded.
- Step 5 — Connection and platform: Esthetic zone or thin biotype: BL with platform switching and internal/Morse taper connection. Posterior high-load: Morse taper. Standard posterior: internal hex acceptable.
- Step 6 — Loading protocol decision: Confirm insertion torque target (25–45 Ncm) and ISQ target (above 65–70) for immediate loading. If site anatomy suggests these thresholds are unlikely, plan for delayed loading.
- Step 7 — Restorative planning: Confirm interocclusal space, emergence profile plan, and impression strategy before surgery.
- Step 8 — Parafunction screen: If bruxism is present, select a Morse taper connection, wider-diameter implant, and plan an occlusal guard.
Scenario matrix
| Clinical scenario |
Suggested design direction |
| Single anterior tooth, thin biotype |
BL, platform switching, hydrophilic SLA, Morse taper, soft-tissue graft |
| Single posterior molar, D2 bone |
Parallel or mildly tapered, internal hex or Morse taper, standard SLA |
| Single posterior molar, D4 bone |
Tapered deep-threaded, Morse taper, consider wider diameter |
| Short-span posterior bridge |
Tapered or parallel per bone density; avoid narrow diameter under bridge |
| Full-arch immediate loading |
Tapered deep-threaded, Morse taper, ISQ > 65–70 confirmed intraoperatively |
| Severely atrophic maxilla |
Zygomatic or subperiosteal; cortical anchorage strategies |
Pro Tip: Document your intraoperative insertion torque and ISQ values in the patient record at placement. If a complication develops at 6 or 12 months, that baseline data is the only objective reference for whether primary stability was adequate at the time of surgery.
How this guide was compiled
This article synthesizes evidence from peer-reviewed systematic reviews, prospective and retrospective clinical trials, meta-analyses, and consensus-level guidance documents, primarily sourced from PubMed/PMC. Priority was given to studies with follow-up periods of one year or more, sample sizes above 100 implants, and designs that allowed direct comparison between implant configurations.
Biomechanical data, including finite element analysis findings, were used to explain mechanistic rationale but were not treated as equivalent to clinical outcome evidence. As FEA and bench-testing research makes clear, in vitro boundary conditions do not replicate clinical bone remodeling, and FEA results should be interpreted as directional rather than predictive.
Limitations to keep in mind:
- Heterogeneity across implant systems, surface treatments, follow-up periods, and patient populations limits direct comparison between studies.
- Most long-term data come from specific implant systems (primarily Straumann and similar premium systems); generalizability to all commercially available designs requires caution.
- No vendor comparisons were made in this guide; brand-specific claims require independent verification against primary literature.
Key Takeaways
Implant design selection grounded in bone quality, mucosal thickness, and loading protocol produces more predictable outcomes than any single-variable approach.
| Point |
Details |
| Tapered designs for soft bone |
Tapered, deep-threaded implants achieve higher primary stability in D3–D4 bone and immediate placement scenarios. |
| BL and TL survival is comparable |
Bone-level and tissue-level implants both demonstrate survival rates exceeding 90% (mean 92%) over long-term follow-up, with no clinically significant difference. |
| Mucosal thickness is protective |
Greater mucosal thickness is independently associated with reduced peri-implantitis risk (OR 0.17 in multivariate analysis). |
| Platform switching preserves crestal bone |
BL implants with platform switching showed 0.05 mm mesial bone remodeling at one year versus 0.47 mm for TL implants. |
| Onewd for applied training |
Onewd’s tiered CE courses cover biomechanics, CBCT planning, and live surgery to translate this evidence into clinical skill. |
Why design selection is only half the equation
There is a tendency in implant education to treat design selection as the endpoint: choose the right macro-shape, surface, and connection, and outcomes take care of themselves. The evidence does not support that framing.
The ITI Forum consensus is explicit: objective biomechanical and biologic criteria must drive selection, not brand familiarity. But even a perfectly selected implant placed in poorly managed soft tissue, or restored without accounting for parafunction, will underperform. The long-term data showing that plaque score, smoking, and mucosal thickness predict peri-implantitis more reliably than platform level alone should shift how clinicians allocate their planning attention.
What gets underweighted in most clinical training is the soft-tissue side of the equation. Mucosal thickness is a modifiable variable. Augmenting a thin biotype at placement costs 20–30 minutes; managing peri-implantitis at year 5 costs far more in clinical time, patient trust, and outcomes. The same logic applies to occlusal guard fabrication for bruxers: it is a prevention step that most clinicians recommend but fewer actually confirm is in place before final restoration delivery.
The other underappreciated point is documentation. Insertion torque and ISQ values recorded at placement are the only objective baseline for evaluating a complication months or years later. Without them, you are managing a problem without knowing what normal looked like for that specific patient and site.
Design knowledge matters. But the clinicians who get the best long-term results are the ones who treat soft tissue, occlusion, and documentation with the same rigor they apply to implant selection.
Onewd courses that build these clinical skills
Selecting the right implant design on paper is one thing. Executing the osteotomy protocol, reading insertion torque in real time, managing a thin biotype, and delivering a provisional that shapes the emergence profile — those skills come from repetition under supervision, not from reading alone.
Onewd’s implant and surgery courses are structured around exactly the clinical decisions this guide covers: CBCT-based planning, macro-design selection, loading protocol thresholds, and prosthetic workflow. The curriculum runs from an on-demand introduction to implant placement for clinicians building foundational knowledge, through to advanced hands-on seminars with live surgery and mentorship for those ready to refine technique on real cases. Every level includes accredited CE credits. Browse the full training course catalog to find the format and depth that fits where you are in your implant practice right now.
Useful sources and recommended reading
- Bone-Level Versus Tissue-Level Titanium Dental Implants: A Comparative Cross-Sectional Study (PMC) — The most comprehensive long-term comparative analysis of BL vs. TL implants (mean 11.2 years, 336 implants); primary source for survival and peri-implantitis prevalence data in this guide.
- Systematic review comparing bone-level and tissue-level implant outcomes (PMC) — Pooled survival and marginal bone data across 1–5 year follow-ups; foundational reference for the equivalence claim.
- Crestal Bone Changes in Different Implant Designs: A Prospective Clinical Trial (PMC) — Prospective 1-year data on mesial bone remodeling for BL vs. TL; source for the 0.05 mm vs. 0.47 mm figures.
- Biomechanical studies on thread geometry and primary stability (PMC) — Evidence base for tapered/deep-threaded design advantages in low-density bone and FEA interpretation guidance.
- Peri-implantitis and survival outcomes: systematic review and meta-analysis (PMC) — Pooled peri-implant mucositis (18.8%) and peri-implantitis (9.6%) prevalence figures.
- Evidence linking mucosal thickness with peri-implant health (PMC) — Clinical evidence for mucosal thickness as a modifiable protective factor.
- Radiological outcomes of bone-level and tissue-level dental implants: systematic review (MDPI) — MDPI systematic review confirming no consistent superiority across 1–5 year follow-ups.
- ITI Forum Implantologicum expert perspectives — Consensus-level guidance on holistic, objective implant selection criteria.
- Onewd implant and surgery CE courses — Structured continuing education covering the clinical skills referenced throughout this guide.
Recommended