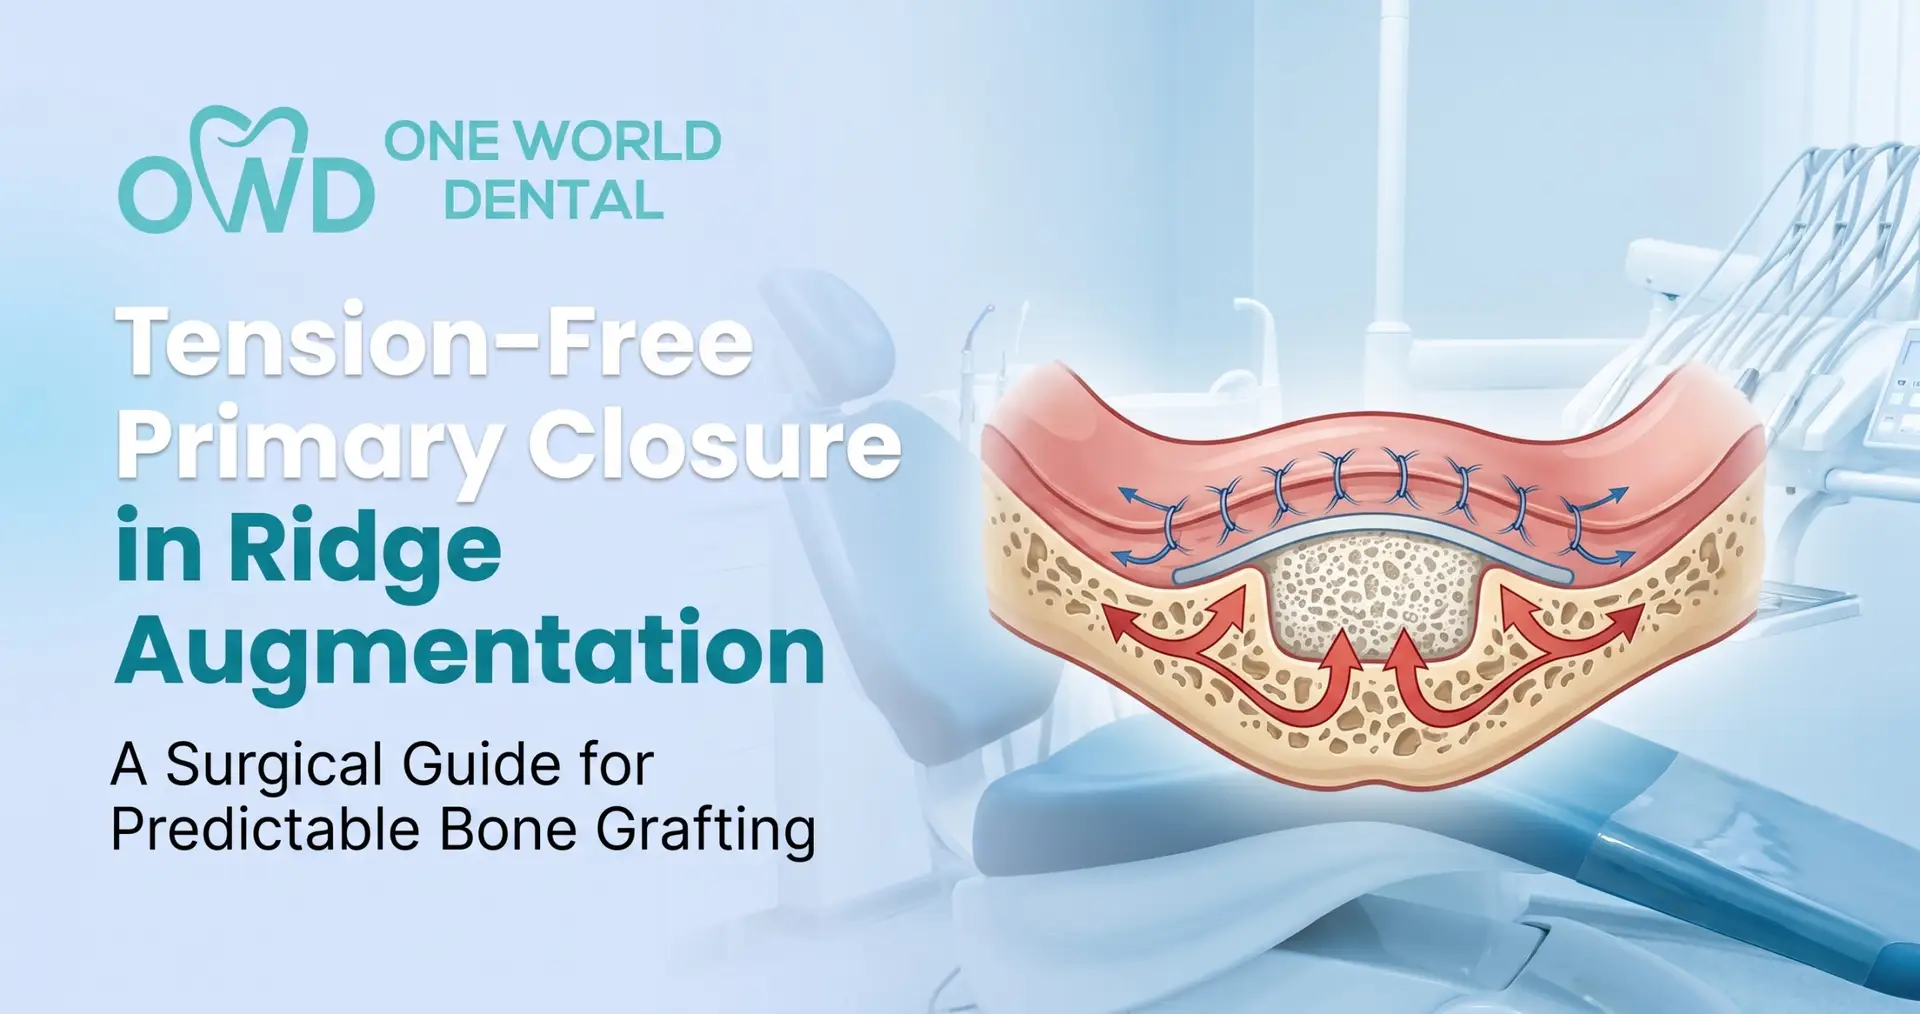
Achieving tension-free primary closure in ridge augmentation is the single most important factor determining whether a bone graft succeeds or fails. Soft tissue management dictates the survival of the graft long before new bone ever forms. When a flap closes under tension, blood supply decreases, sutures pull through, and wound breakdown becomes inevitable.
+-------------------------------------------------------------------+
|                     THE CHAIN OF GRAFT FAILURE                    |
|                                                                   |
|   Excessive Flap Tension  --->  Microvascular Ischemia & Contraction |
|                                             |                     |
|                                             v                     |
|   Early Graft Infection   <---  Wound Dehiscence & Exposure       |
+-------------------------------------------------------------------+
Predictable Guided Bone Regeneration (GBR) requires total mastery over flap mobilization, surgical incision design, and suture mechanics. Clinicians who struggle with early membrane exposure usually do not have a bone graft problem—they have a soft tissue release problem.
Why Primary Closure Fails: Biological Mechanics of Flap Tension
Primary closure fails when surgical mechanics violate basic tissue biology. Mucoperiosteal flaps are dynamic, living tissues governed by blood flow and elasticity.
Vascularity Compromise and Ischemia
When a mucosal flap is pulled tightly over a bulky bone graft or barrier membrane, internal tissue pressure rises. This pressure compresses the local microvascular capillary bed.
Capillary Collapse: Local blood pressure drops below the external tension force, stopping tissue perfusion.
Ischemic Necrosis: Starved of oxygen and nutrients, the wound margins suffer localized cell death.
Suture Cut-Through: Ischemic tissue loses structural integrity, causing sutures to slice cleanly through flap edges.
The Wound Dehiscence Cascade
Once ischemic tissue breaks down, the wound opens. This exposes underlying barrier membranes and particulate graft materials.
Exposed non-resorbable membranes or collagen matrices quickly attract oral bacteria. Salivary contamination spreads across the graft bed within hours, leading to premature membrane removal and partial or total graft loss.
Tissue Shrinkage and Biotype Dynamics
Post-surgical edema expands flap tissue during the first 48 to 72 hours. As swelling recedes, inflammatory contraction pulls flap edges apart. Thin periodontal biotypes (less than 1.5 mm thick) are far more susceptible to ischemic tears than thick, fibrous biotypes.
Pre-Surgical Assessment and Flap Planning
Predictable flap release begins long before making the first incision. Evaluating local anatomical factors determines where to place incisions and how much flap advancement you need.
Evaluating Soft-Tissue Biotype
Keratinized Mucosa (KM): Measure the width of attached keratinized tissue. If KM is scarce, plan incisions to preserve every millimeter.
Vestibular Depth: A shallow vestibule offers less mobile mucosa, requiring deeper periosteal releasing incisions to gain flap elasticity.
Defect Classification
Horizontal defects require moderate coronal flap advancement. Vertical ridge augmentation demands extreme flap displacement—often 8 to 10 mm or more—to cover tall tenting screws and structural membranes without tension.
Anatomical Risk Mapping
Advancing flaps safely requires a clear map of local neurovascular structures:
Mandibular Posterior: Map the mental nerve bundle before placing vertical releasing incisions. Avoid deep sharp dissection near the premolar roots.
Mandibular Lingual: Identify the floor-of-mouth anatomy. The lingual nerve runs close to the periosteum near the second and third molars.
Maxillary Anterior: Watch for the infraorbital nerve during high vestibular reflection, along with the anterior superior alveolar (ASA) blood supply.
Incision Design & Surgical Access
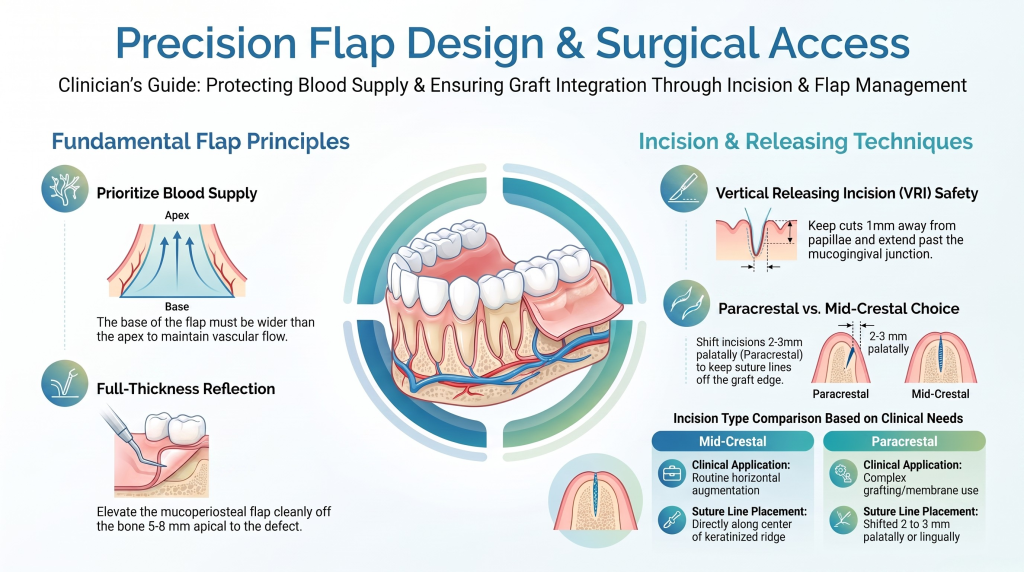
Proper flap design creates clean tissue margins and protects the blood supply feeding the graft site.
                    Mucogingival Junction (MGJ)
   Interdental               |                   Alveolar
     Papilla                 v                    Mucosa
      |======================|======================|
      |   Base of Flap (Wider)  >  Apex (Narrower)   |
      |======================|======================|
                             ^
                             |
                   Blood Supply Direction
Paracrestal vs. Mid-Crestal Incisions
Mid-Crestal Incisions: Placed directly along the center of the keratinized ridge. Best for routine horizontal augmentation with adequate keratinized tissue.
Paracrestal Incisions: Shifted 2 to 3 mm palatally or lingually. This design ensures the final suture line does not rest directly over the graft or membrane edge.
Vertical Releasing Incisions (VRIs)
Divergent Base: Make the base of the flap wider than the crestal margin to maintain blood flow.
Papilla Preservation: Keep vertical cuts at least 1 mm away from adjacent interdental papillae to avoid marginal recession.
Extent: Extend VRIs well past the mucogingival junction (MGJ) into the unattached alveolar mucosa.
Full-Thickness Reflection
Elevate a full-thickness mucoperiosteal flap cleanly off the bone using a sharp periosteal elevator. Carry the reflection 5 to 8 mm apical to the defect margin to expose healthy host bone for decortication.
The periosteum is an inelastic fibrous layer. Scoring this layer releases intrinsic tissue tension instantly.
Blade Angle: Hold a #15c blade parallel to the underlying bone surface.
Incision Depth: Score only the thin periosteal layer (1 mm deep). Avoid cutting into the overlying elastic mucosal fibers or submucosal blood vessels.
Execution: Make a continuous horizontal scoring line through the periosteum along the entire base of the buccal flap, just apical to the MGJ.
Lingual Flap Release (Mandible)
Buccal advancement alone is often insufficient in the posterior mandible. Advancing the lingual flap is essential for vertical ridge augmentation.
Locate the Mylohyoid Ridge: Reflect the lingual flap gently until the attachment of the mylohyoid muscle is visible.
Blunt Dissection: Use a blunt instrument (such as a tissue scraper or cotton-tipped applicator) to push the mylohyoid fibers apically off the lingual flap.
Protecting Nerves: Avoid sharp blade cuts on the lingual aspect. Blunt mobilization frees up 5 to 10 mm of passive lingual flap release safely.
Coronal Flap Displacement
After scoring the periosteum, insert curved tissue scissors or a micro-blade into the PRI cut. Use gentle spreading motions to split the elastic mucosal submucosa away from the periosteal base. This step expands the mucosal apron, allowing it to stretch passively over large structural grafts.
Managing the Graft & Space Maintenance During Closure
Space-maintaining hardware must never interfere with soft tissue closure.
Tenting Screws: Ensure tenting screw heads are smooth and free of sharp edges.
Membrane Trimming: Trim barrier membranes so they sit at least 1.5 to 2 mm away from adjacent teeth and flap margins.
Fixation Pins: Secure membranes firmly to host bone using tacks or screws. Loose membrane edges shift under the flap, causing mechanical irritation and wound breakdown.
Suture Selection, Patterns, and Techniques for Tension Mitigation
Suturing is the final layer of defense. The goal is to adapt tissue margins passively, not to pull tight tissues together by force.
Suture Material Selection
Select materials based on physical performance, elasticity, and bacterial resistance:
Suture Material
Structure
Tension Retention
Wicking Risk
Common Clinical Use
PTFE (ePTFE)
Monofilament
Excellent (21+ Days)
None
Vertical & Horizontal GBR
PDS / Maxon
Monofilament
High (14–21 Days)
None
Deep Periosteal Anchoring
Chromic Gut
Monofilament
Low (5–7 Days)
Low
Secondary Approximations
Vicryl / Silk
Braided
Moderate
High
Avoid Over Exposed Graft Sites
Layered Suturing Strategy
Never rely on a single line of sutures to hold a high-tension graft site together. Use a two-layer approach:
  TENSION-RELIEVING LAYER (Deep)  --->  Horizontal Mattress Sutures (4-0 PTFE)
                                        (Sets tissue 3-5 mm apically)
                                                    |
                                                    v
  MARGINAL CLOSURE LAYER (Surface) ---> Single Interrupted Sutures (5-0/6-0 PTFE)
                                        (Approximates edge mucosa)
Deep Tension-Relieving Layer: Place horizontal mattress sutures 3 to 5 mm apical to the incision line. These deep sutures bear all the muscle pull and mechanical tension.
Marginal Closure Layer: Place single interrupted sutures along the outer flap edge. Because the deep mattress sutures absorb the tension, these surface sutures adapt the flap margins loosely and passively.
Intraoperative Tension Assessment: The “Passive Adaptation” Test
Never begin suturing until you test the flap for complete passive adaptation.
                  +-----------------------------------+
                  |   THE PASSIVE ADAPTATION TEST     |
                  +-----------------------------------+
                  | 1. Advance buccal flap over graft.|
                  | 2. Flap must overlap lingual edge |
                  |    by 3 to 5 mm WITHOUT pulling.  |
                  | 3. Release flap: It should NOT    |
                  |    rebound or spring back.        |
                  +-----------------------------------+
The 3–5 mm Overlapping Rule
Pull the elevated buccal flap over the bone graft toward the lingual edge. The flap margin must overlap the opposing lingual tissue by 3 to 5 mm without stretching.
The Rebound Check
Rest the flap over the graft site without holding it in place with forceps. If the tissue springs back or uncovers the graft, the flap is under tension. Re-evaluate your periosteal releasing incisions and perform additional submucosal dissection before placing a single suture.
Postoperative Protocols to Prevent Early Dehiscence
Flap management continues into the healing phase. Post-operative care protects the fragile surgical site from mechanical trauma and swelling.
Infection Control: Prescribe systemic broad-spectrum antibiotics for 7 to 10 days. Instruct patients to use a 0.12% Chlorhexidine Gluconate rinse twice daily. Advise against active swishing; gentle head-soaking prevents fluid pressure from disturbing the flap.
Edema Control: Instruct patients to apply ice packs for the first 24 to 48 hours. Consider a short course of oral corticosteroids (such as a Medrol Dosepak) for complex vertical augmentations to control post-op swelling.
Suture Removal Timeline: Leave deep PTFE mattress sutures in place for 14 to 21 days. Removing sutures too early allows immature collagen bonds to separate under light muscle pull.
Troubleshooting Complications & Early Exposure
Even skilled surgeons encounter flap complications. Early action determines whether you save or lose the graft.
                         WOUND BREAKDOWN DETECTED
                                    |
                    +---------------+---------------+
                    |                               |
          Early Exposure (< 2 Wks)        Late Exposure (> 4 Wks)
                    |                               |
       • Do NOT re-suture tight edges   • Debride loose graft material
       • Apply topical Chlorhexidine    • Remove loose membrane
       • Weekly clinical checks         • Preserve underlying osteoid
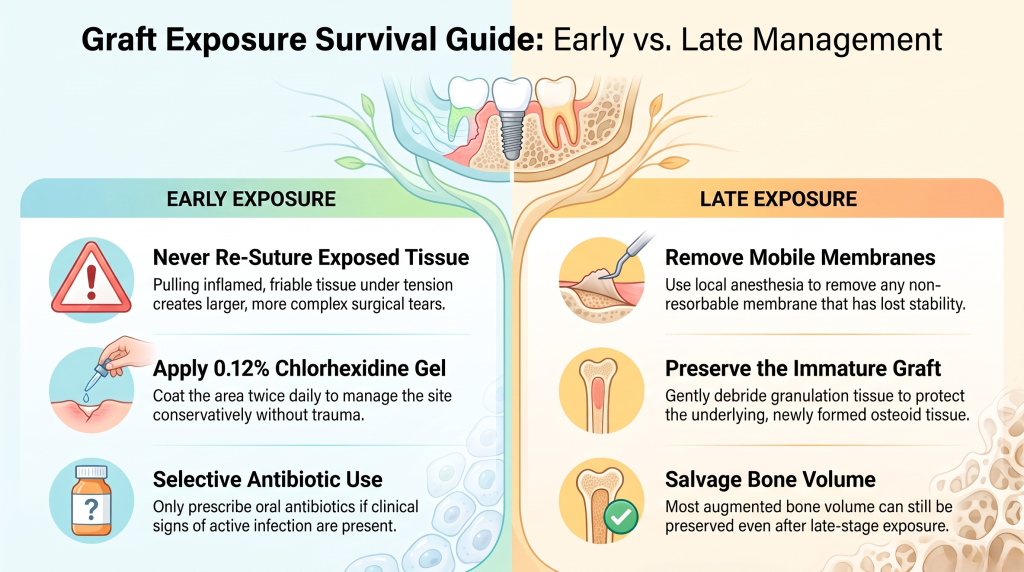
Early Exposure (< 2 Weeks)
Never Re-Suture: Attempting to pull inflamed, friable tissue back together under tension causes larger surgical tears.
Conservative Management: Coat the exposed area with 0.12% chlorhexidine gel twice daily. Prescribe oral antibiotics if clinical signs of active infection appear.
Late Exposure (> 4 Weeks)
Evaluate Membrane Stability: If a non-resorbable membrane mobilizes, remove it using local anesthesia.
Protect the Immature Graft: Debride soft granulation tissue gently. In many cases, underlying osteoid tissue has already formed, preserving a significant portion of the augmented bone volume.
Elevate Your Surgical Outcomes with One World Dental
Mastering soft tissue release requires hands-on practice, expert demonstration, and personalized instruction. While understanding the theory of periosteal release and mattress suturing is an essential start, putting these techniques into practice on complex clinical cases demands real-world experience.
At One World Dental, founded by veteran educator Dr. Kambez Shukoor, we bridge the gap between textbook theory and practical surgical confidence. Our comprehensive continuing education programs feature step-by-step video instruction, hands-on simulation labs, and live surgical modules.
Whether you are looking to refine your horizontal GBR protocols or master advanced vertical ridge augmentations, One World Dental offers tailored, tiered learning paths to help you provide predictable care for every patient.
Frequently Asked Questions (PAA)
What is primary closure in ridge augmentation?
Primary closure is the complete, gap-free adaptation of surgical tissue flaps over a bone graft or barrier membrane. Achieving primary closure without tissue tension prevents bacterial contamination and allows uninterrupted bone regeneration.
How do you perform a periosteal releasing incision safely?
A periosteal releasing incision is performed by scoring the inner inelastic periosteal layer of a flap with a sharp blade parallel to the underlying bone. The cut should be light and continuous (about 1 mm deep) to avoid severing mucosal blood vessels or causing soft tissue tears.
What happens if a bone graft membrane becomes exposed?
If a barrier membrane exposes early, avoid pulling the tight flap edges together with new sutures. Clean the area daily with topical chlorhexidine. If the membrane becomes loose or infected, remove it to protect the underlying host bone bed.
Which suture material is best for tension-free closure in GBR?
ePTFE (polytetrafluoroethylene) monofilament sutures are widely considered the gold standard for GBR. They hold tensile strength over long healing periods, do not wick bacteria into the surgical bed, and remain gentle on healing oral tissues.
How much flap overlap is needed before suturing a ridge augmentation?
A well-mobilized flap should passively overlap the opposing tissue edge by 3 to 5 mm without any pulling or stretching. If the tissue rebounds when released, additional soft tissue advancement is required before placing sutures.
Ready to Master Advanced Soft Tissue Management?
Stop struggling with flap tension and graft dehiscence. Join the community of general dentists and dental specialists elevating their clinical practices through One World Dental.
Explore our upcoming online CE courses, hands-on surgical workshops, and live-patient training modules today.
Educational disclaimer: Content is provided for professional education and is not a substitute for a clinician's independent judgment, applicable standards, manufacturer instructions, or relevant laws and regulations.
For clinicians: a defect-based ridge augmentation guide that matches technique to anatomy, explains mesh and CAD/CAM workflows, plans 4–6 month staging,...